Importing existing virtual machines from foreign hypervisors or other Proxmox VE clusters can be achieved through various methods, the most common ones are:
- Using the native import wizard, which utilizes the import content type, such as provided by the ESXi special storage.
- Performing a backup on the source and then restoring on the target. This method works best when migrating from another Proxmox VE instance.
- using the OVF-specific import command of the qm command-line tool.
If you import VMs to Proxmox VE from other hypervisors, it’s recommended to familiarize yourself with the concepts of Proxmox VE.
An easy way to deploy many VMs of the same type is to copy an existing VM. We use the term clone for such copies, and distinguish between linked and full clones.
- Full Clone
- The result of such copy is an independent VM. The new VM does not share any storage resources with the original.
It is possible to select a Target Storage, so one can use this to migrate a VM to a totally different storage. You can also change the disk image Format if the storage driver supports several formats.

A full clone needs to read and copy all VM image data. This is usually much slower than creating a linked clone. Some storage types allows to copy a specific Snapshot, which defaults to the current VM data. This also means that the final copy never includes any additional snapshots from the original VM.
- Linked Clone
- Modern storage drivers support a way to generate fast linked clones. Such a clone is a writable copy whose initial contents are the same as the original data. Creating a linked clone is nearly instantaneous, and initially consumes no additional space.
They are called linked because the new image still refers to the original. Unmodified data blocks are read from the original image, but modification are written (and afterwards read) from a new location. This technique is called Copy-on-write.
This requires that the original volume is read-only. With Proxmox VE one can convert any VM into a read-only Template). Such templates can later be used to create linked clones efficiently.
You cannot delete an original template while linked clones exist. It is not possible to change the Target storage for linked clones, because this is a storage internal feature.
The Target node option allows you to create the new VM on a different node. The only restriction is that the VM is on shared storage, and that storage is also available on the target node.
To avoid resource conflicts, all network interface MAC addresses get randomized, and we generate a new UUID for the VM BIOS (smbios1) setting.
Import Wizard
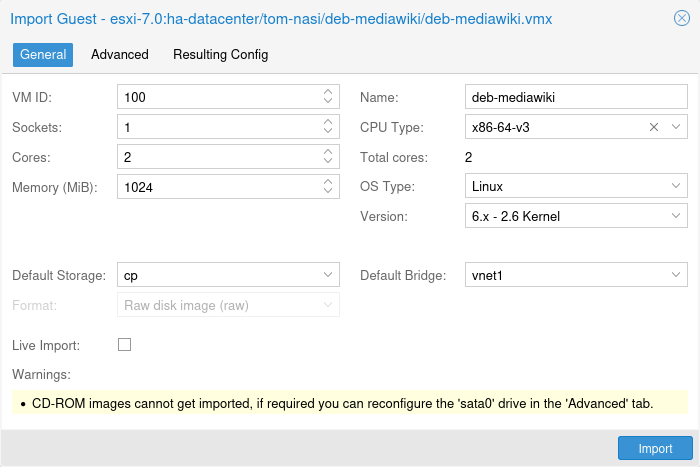 Proxmox VE provides an integrated VM importer using the storage plugin system for native integration into the API and web-based user interface. You can use this to import the VM as a whole, with most of its config mapped to Proxmox VE’s config model and reduced downtime.
|
The import wizard was added during the Proxmox VE 8.2 development cycle and is in tech preview state. While it’s already promising and working stable, it’s still under active development, focusing on adding other import-sources, like for example OVF/OVA files, in the future. |
To use the import wizard you have to first set up a new storage for an import source, you can do so on the web-interface under Datacenter → Storage → Add.
Then you can select the new storage in the resource tree and use the Virtual Guests content tab to see all available guests that can be imported.
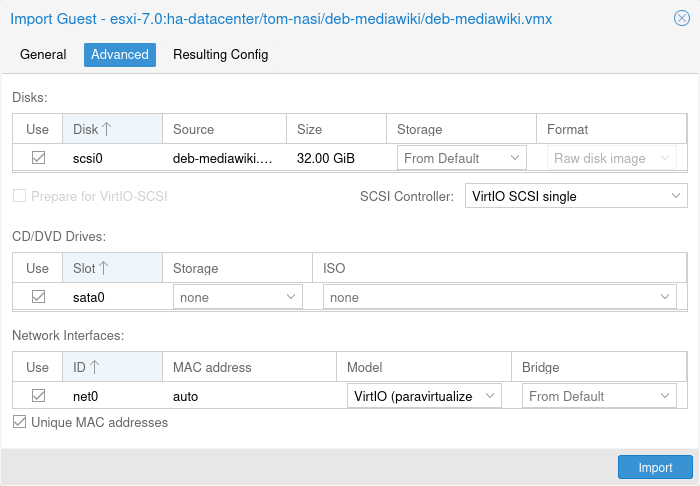 Select one and use the Import button (or double-click) to open the import wizard. You can modify a subset of the available options here and then start the import. Please note that you can do more advanced modifications after the import finished.
 |
The import wizard is currently (2024-03) available for ESXi and has been tested with ESXi versions 6.5 through 8.0. Note that guests using vSAN storage cannot be directly imported directly; their disks must first be moved to another storage. While it is possible to use a vCenter as the import source, performance is dramatically degraded (5 to 10 times slower). |
For a step-by-step guide and tips for how to adapt the virtual guest to the new hyper-visor see our migrate to Proxmox VE wiki article.
Import OVF/OVA Through CLI
A VM export from a foreign hypervisor takes usually the form of one or more disk images, with a configuration file describing the settings of the VM (RAM, number of cores).
The disk images can be in the vmdk format, if the disks come from VMware or VirtualBox, or qcow2 if the disks come from a KVM hypervisor. The most popular configuration format for VM exports is the OVF standard, but in practice interoperation is limited because many settings are not implemented in the standard itself, and hypervisors export the supplementary information in non-standard extensions.
Besides the problem of format, importing disk images from other hypervisors may fail if the emulated hardware changes too much from one hypervisor to another. Windows VMs are particularly concerned by this, as the OS is very picky about any changes of hardware. This problem may be solved by installing the MergeIDE.zip utility available from the Internet before exporting and choosing a hard disk type of IDE before booting the imported Windows VM.
Finally there is the question of paravirtualized drivers, which improve the speed of the emulated system and are specific to the hypervisor. GNU/Linux and other free Unix OSes have all the necessary drivers installed by default and you can switch to the paravirtualized drivers right after importing the VM. For Windows VMs, you need to install the Windows paravirtualized drivers by yourself.
GNU/Linux and other free Unix can usually be imported without hassle. Note that we cannot guarantee a successful import/export of Windows VMs in all cases due to the problems above.
Step-by-step example of a Windows OVF import
Microsoft provides Virtual Machines downloads to get started with Windows development.We are going to use one of these to demonstrate the OVF import feature.
Download the Virtual Machine zip
After getting informed about the user agreement, choose the Windows 10 Enterprise (Evaluation – Build) for the VMware platform, and download the zip.
Extract the disk image from the zip
Using the unzip utility or any archiver of your choice, unpack the zip, and copy via ssh/scp the ovf and vmdk files to your Proxmox VE host.
Import the Virtual Machine
This will create a new virtual machine, using cores, memory and VM name as read from the OVF manifest, and import the disks to the local-lvm storage. You have to configure the network manually.
# qm importovf 999 WinDev1709Eval.ovf local-lvm
The VM is ready to be started.
Adding an external disk image to a Virtual Machine
You can also add an existing disk image to a VM, either coming from a foreign hypervisor, or one that you created yourself.
Suppose you created a Debian/Ubuntu disk image with the vmdebootstrap tool:
vmdebootstrap --verbose \
 --size 10GiB --serial-console \
 --grub --no-extlinux \
 --package openssh-server \
 --package avahi-daemon \
 --package qemu-guest-agent \
 --hostname vm600 --enable-dhcp \
 --customize=./copy_pub_ssh.sh \
 --sparse --image vm600.raw
You can now create a new target VM, importing the image to the storage pvedir and attaching it to the VM’s SCSI controller:
# qm create 600 --net0 virtio,bridge=vmbr0 --name vm600 --serial0 socket \
   --boot order=scsi0 --scsihw virtio-scsi-pci --ostype l26 \
   --scsi0 pvedir:0,import-from=/path/to/dir/vm600.raw
The VM is ready to be started.
Source: https://pve.proxmox.com/wiki/Qemu/KVM_Virtual_Machines#qm_import_virtual_machines
Disponível em:  Português (Portuguese (Brazil))
 English
 Español (Spanish)